***** ALERT - Nominations for your new ClubCJ Committee can be made here *****

foglights

Alarms, Smart Key, Batteries, Wiring, Engine/Computer Management & Racing Chips.

Moderators: Moderators, Senior Moderators

User avatar
washman
Lancer ES/EX
Lancer ES/EX
Posts: 107
Joined: Fri Mar 11, 2011 7:55 pm
Location: Sydney

foglights

Postby washman » Sun Nov 13, 2011 9:54 am

Which ones should i get?
these foglights

http://www.ebay.com.au/itm/Mitsubishi-L ... _616wt_952
or these

http://www.ebay.com.au/itm/New-07-11-Mi ... 3283wt_958

Any feed back on the products would be helpful aswell, cheers guys :)

User avatar
sleepy
Lancer VR/GT
Lancer VR/GT
Posts: 255
Joined: Fri Jul 29, 2011 6:28 pm
Location: Sydney, Australia

Postby sleepy » Sun Nov 13, 2011 3:53 pm

Interesting.. the CCFL ones look really nice. Though I'd like to see some pics with them on.. tempting for me to buy since I don't have any on atm...

User avatar
bryzabone
Lancer VR/GT
Lancer VR/GT
Posts: 202
Joined: Mon Feb 22, 2010 12:18 am
Location: Alstonville, NSW

Postby bryzabone » Mon Dec 05, 2011 10:19 pm

hmm, tough call. not seeing them operate is a real disservice to the seller.
I'm thinking of getting the top ones, as they have a proper in-dash switch, much neater and pro install. the little hand controller for the ccfl's are very 'un-audi' when blutacked to the dash under the steering wheel imho.
For every "Drive Safely" sign, shouldn't there be a "Resume Normal Driving" sign?

User avatar
quachj
Lancer ES/EX
Lancer ES/EX
Posts: 117
Joined: Tue Oct 04, 2011 11:12 pm
Location: Springvale, Melbourne

Postby quachj » Mon Dec 05, 2011 11:52 pm

http://www.ebay.com.au/itm/Mitsubishi-L ... _616wt_952

i have that set on my sx. it was easy to put the fog lights in but when it came to getting the wire from the engine buy to the dash it was hard as you have to make a hole where the firewall is and stick the cable pass and into ur car. apart from that looks good and works fine

seller was very helpful when one of the light came damaged he sent me a new one

User avatar
Millerz
Lancer Newbie
Lancer Newbie
Posts: 22
Joined: Wed Sep 21, 2011 9:12 am
Location: Melbourne, Australia

Postby Millerz » Tue Dec 06, 2011 11:28 am

quachj wrote:...you have to make a hole where the firewall is and stick the cable pass and into ur car. ...


Not really, there is an unused grommet on the driver side firewall just below the brake booster/master cylinder assembly. its a bit hard to find. the grommet cover will come off from inside the cabin. I drilled a hole through the grommet cover just enough to force the wire through.

Search the forums for ebay fogs, there were a couple of threads with good info.

Just FYI, mines a MY11 SX.
Millerz
Lancer CJ SX + leather + reverse sensors + DIY sunglass holder.
<sub>"I'd rather die on my feet than live on my knees" </sub>

User avatar
JaZira5
Lancer VR/GT
Lancer VR/GT
Posts: 213
Joined: Sat Mar 12, 2011 3:03 am
Location: Hawthorne, Queensland, Australia

Postby JaZira5 » Fri Dec 16, 2011 6:21 pm

I followed a guide about wiring up DRL lights to install my fog lights wiring. No drilling required. I just popped open the side door gromet (the thick rubber tube that connects the door and body/ cabin. It can be done for either side.

I went from the engine bay through the side fender space, past the side fender plastic firewall, into the grommet (coming from under, so that any water drips down and not into the cabin), and then connected the wires under the dash. I wired my fog lights directly into the driver side panel, so that I can easy install the switch and hid the wires via zip tie on a vertical metal harness. After that I just pushed the grommet close.

For a cleaner install, it might be ideal to cut the grommet abit for thicker wires and then resealed with some type of water proof silicon.

Hope that helps. ^_^

User avatar
sleepy
Lancer VR/GT
Lancer VR/GT
Posts: 255
Joined: Fri Jul 29, 2011 6:28 pm
Location: Sydney, Australia

Postby sleepy » Sat Dec 17, 2011 10:24 pm

Just as a precautionary... and as Tyron said above me, the first set of foglights from the first ebay link, the set of foglights the guy provided me were a little ... broken to say the least.

I was at Concord Customs today getting it installed, which ended up taking around 3-4 hours because we were trying to get it to work with a non-australian standard relay which later on fried, a faulty harness (which we weren't aware of) and a switch that didn't fit.

Luckily, I contacted the ebay seller (on his mobile number) and he was in Rydalmere which was no more than 10 minutes away from Concord Customs. The guys from CC were awesome enough to come with me to the suppliers shop and the supplier was cooperative enough to offer a refund or try out a new harness.

In the end everything worked, got the proper switch size (which should've been provided in the first place) and new harness. In my setup I have it wired into the cigarette lighter. Foggies can turn on when I turn on the car (so long as the switch is on), or they can stay off if the button is not toggled.

Apart from the little mishap today, CC and the supplier were very cooperative.

User avatar
bryzabone
Lancer VR/GT
Lancer VR/GT
Posts: 202
Joined: Mon Feb 22, 2010 12:18 am
Location: Alstonville, NSW

Postby bryzabone » Mon Dec 19, 2011 9:23 am

any chance of some pictures of your guys wiring through the firewall? 2 very different ways, and i dont like the online instructions i found. I just dont like the idea of drilling a hole and pulling a wire through the main wiring loom to the engine bay! that, and it ends up on the passenger side, being US instructions...

thanks guys

Also, can you find/supply us the part number for the 380 fog light switch, so i can order it for my fogs when i install em? cheers
For every "Drive Safely" sign, shouldn't there be a "Resume Normal Driving" sign?

User avatar
JaZira5
Lancer VR/GT
Lancer VR/GT
Posts: 213
Joined: Sat Mar 12, 2011 3:03 am
Location: Hawthorne, Queensland, Australia

Postby JaZira5 » Mon Dec 19, 2011 11:13 am

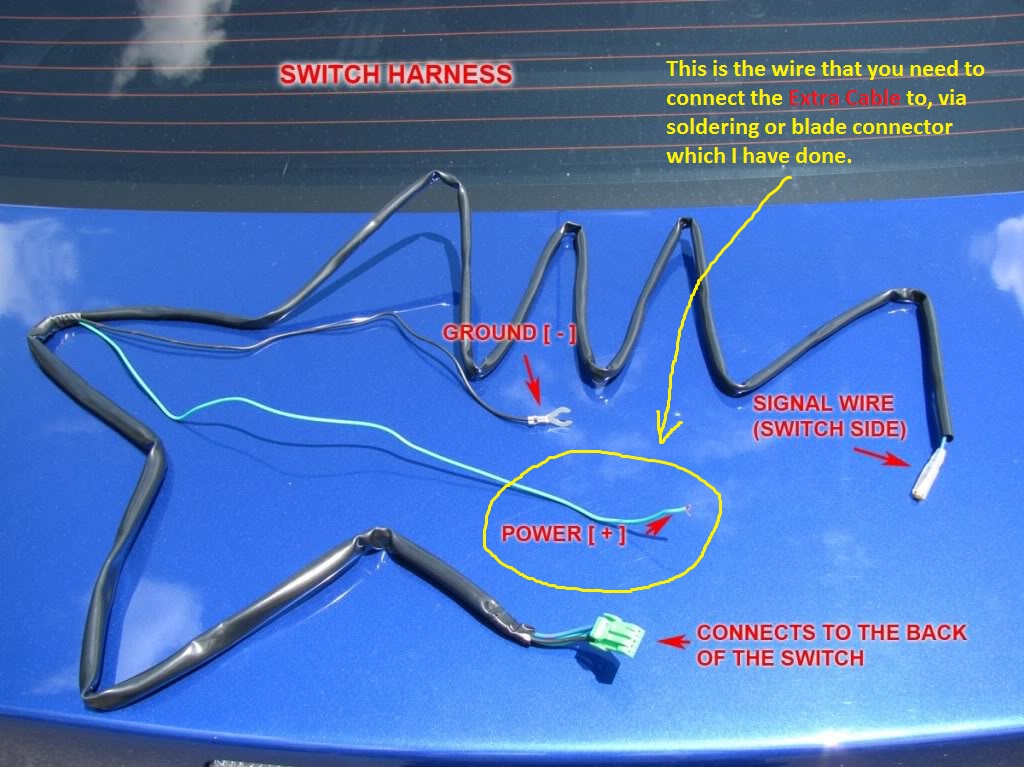
Concerning my setup. I have to add that I bought some extra wire from supercheap. Some "low tension cable" "4mm 20amp" wire. I think I only ended up using 1.5-2m of cable not exactly sure, but I added extra length for flexibility while I connected everything. Plus you will need a male and female "Blade connector".

This is the cable that I used to connect the "Driver Side Parker Light" and "Power +ve wire" (the one attached to the Switch side cable) together, using the "T-Tap" (Vampire wire). Then using the "Blade Connector" I connected the other end of the cable to the "Power +ve wire". Which are fed via the driver side door grommet into the cabin. Doing this allows you to use your fog lights only when the headlights (parker lights or low beam) are in use, but you can still control when its switches on and off via the switch.

[s]I'll take photo's for you later of how I did this, as I have work very soon. Plus the lighting in Brisbane atm is not so good for my camera phone. TOO bright.[/s]

Though my setup is not that hard, as all you need to do is pull out the door grommet (carefully), then push it through into the cabin. You just need to follow the installing fog light guide from evolutionm.net about removing the panels under the steering wheel so that you can access that area.

Here is some photos of what I did. I'll add more in the morning. Feeling sick and tired after work atm.

1. Plan of layout of side fender wiring.
Image

2. Place where I mounted the FUSE and RELAY cables.
Image

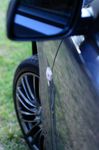
3. This is how I wired up my "Power +ve Wire" (of the switch cable) to the Driver Side Parker Lights.
Image

4. This is where I zip tied my cables before it went into the side fender.
Image

5. This is an access point to help push the cables through the side fender.
Image

6. This is the second access point to help push the cables through the side fender and past the fender plastic firewall.
Image

7. The cables (Signal Wire and Extra Cable) come out of the fender space through here and go down towards the grommet.
Image

8. Image of grommet that needs to be pulled out (carefully) and the cables pushed into the cabin from underneath so that water doesnt enter the cabin.
Image

Hope that helps. More pictures soon, when I have time tomorrow. ^_^

edited: Grammar, clarifying of wires connected and added photos.[/img]
Last edited by JaZira5 on Tue Dec 20, 2011 9:33 am, edited 1 time in total.

User avatar
JaZira5
Lancer VR/GT
Lancer VR/GT
Posts: 213
Joined: Sat Mar 12, 2011 3:03 am
Location: Hawthorne, Queensland, Australia

Postby JaZira5 » Tue Dec 20, 2011 10:13 am

wow good right up! tbh i like the way youve done your set up! personally i never liked the idea of drilling holes into rubber grommets n such!

im imagining the extra wire is ur signal wire meaning that wen u turn ur lights on ur fogs will come on also?

just clearing up some confusion!


Thank you. I too didnt like the drilling of holes idea. And so was inspired by coolwave911 to do it this way, who wrote a DIY about "how to properly wire a led drl set". I also followed the guide from http://forums.evolutionm.net/lancer-how-tos-installations/431771-how-install-ebay-fog-lights.html.

So to the point, no the Extra Cable is NOT connected to the Signal Wire, but is connected to the "Power (positive) Wire" (of the Switch Cables), via Blade Connectors. The signal wire (of the Switch Cables) is connected to the Signal Wire end of the Main Fog Lights Cable.

Here is some photo's of what I'm referring to:

1. Image of the Switch Cables and the "Power (Postive) Wire" which the Extra Cable is connected to using Blade Connectors.
Image

2. This image is of the Main Fog Lights Cable. As you can see the Signal Wire here is obviously going to be connected to the Signal Wire of the Switch Cable side.
Image

By doing it this way, when ever you turn on the Parker/Low Beam Lights, you can turn on (or off) your Fog Lights via the switch.

I hope that helps and makes a few things clearer. ^_^


PS. For those interested I bought these Fog Lights, as they are "E Marked" http://cgi.ebay.com.au/ws/eBayISAPI.dll?ViewItem&item=150635222498

Edited: Added reasoning to doing it this way; which cable; and ebay link.

User avatar
bryzabone
Lancer VR/GT
Lancer VR/GT
Posts: 202
Joined: Mon Feb 22, 2010 12:18 am
Location: Alstonville, NSW

Postby bryzabone » Thu Dec 29, 2011 2:38 am

thanks ramon, i'll have a good look at my car tomorrow, work out which way to go. I still cant get the under-dash off! my clips must be stuck...

FYI, the loom i got from the ebay link(1st post, non angel ones) have a full plug on them to go to the supplied switch, so your method might allow me to feed the square plug through easier.

cheers! :)
For every "Drive Safely" sign, shouldn't there be a "Resume Normal Driving" sign?

User avatar
JaZira5
Lancer VR/GT
Lancer VR/GT
Posts: 213
Joined: Sat Mar 12, 2011 3:03 am
Location: Hawthorne, Queensland, Australia

Postby JaZira5 » Thu Dec 29, 2011 3:35 am

bryzabone wrote:thanks ramon, ill have a good look at my car tomorrow, work out which way to go. I still cant get the under-dash off! my clips must be stuck... FYI, the loom i got from the ebay link(1st post, non angel ones) have a full plug on them to go to the supplied switch, so your method might allow me to feed the square plug through easier. cheers! :)


No problems. Just remember to seal that Door Grommet really well, as you dont want any water coming into the cabin. Right next to the grommet is a bunch of wire looms top and bottom behind the panel, that also makes it annoying to fit big hands into (especially when you're zip tying it off to the vertical bracket).

I forgot to mention it, but there is a ground bolt that you can connect to behind the door floor panel that can be easily removed. I was initially going to choose a random bolt attached to the body, but when I saw what it was connected to (the driver knee airbag) I was glad that I looked around for a proper ground point.

And yes, I have to agree the panel is a bit hard to take off at first. But I suggest you make sure you take off all the clips, just use a flat head screw driver to help pry (lift) the clips off. Undo 2 screws. Then slowly starting from the right side (near the door) start pulling the panel away, by supporting the underside with one hand while the other pulls it off the braket.

I can take photo's if you need them. Hope that helps. ^_^


Return to “Electrical”

Who is online

Users browsing this forum: No registered users and 13 guests